|
Upcoming healthcare events
Check out the upcoming healthcare events.
Webinar library
You can now stream or download previously recorded Webinars.
Top
This month's eTips
Did you know that you should always contact Nuance support via telephone for emergency Diagnostic Solutions issues (24/7) requiring immediate assistance?
For immediate emergency support (24x7) issues with any of the following Diagnostic Solutions products, call (800) 833-7776.
- Lung Cancer Screening
- PowerScribe 360 Reporting
- Critical Results
- mPower Clinical Analytics
- ModLink & Advanced Data Integration
- PowerXpress HL7
- Mobile Applications
- Quality Check
- Clinical Guidance
To call in for Nuance Technical emergency support:
- Call (800) 833-7776 to reach Nuance Technical Support.
- When prompted, say Diagnostic Solutions, or say Products and a list of products will be available.
 You should always have your account number available when calling in or speaking with a Nuance Technical Support representative. You should always have your account number available when calling in or speaking with a Nuance Technical Support representative.
- Emergency support calls without a case number, can enter the numeric portion of your customer number when prompted. Otherwise, you should not need to do anything else other than to stay on the line until the next available Nuance Technical Support representative is available to assist you with your Diagnostic Solutions emergency.
- If you do have a case number, you will be directed to Press 1 and prompted to enter the case number. The next available representative will assist you with your Diagnostic Solutions emergency.
See Contacting Support for more details.
Top
Did you know that it is essential for the proper operation of your PowerScribe 360 Reporting system to maintain the Procedure Master Translator (PMT) for versions 2.5 and higher?
Yes, it is essential for the proper operation of your PowerScribe system to maintain the PMT for versions 2.5 and higher.
Inevitably, your Radiology Information System (RIS) will send new procedure codes to PowerScribe 360 Reporting. New codes will be automatically added to the procedure code database in PowerScribe, but will not be mapped to modality, anatomy, or a section. Without these mappings, several features of PowerScribe 360 Reporting will not function properly. This could include Peer Review, Worklists, Custom Fields, AutoTexts, statistics reporting, etc.
Fortunately, it is easy to maintain the PMT, and there are two options.
To maintain your PMT for your PowerScribe 360 system, you can follow any of these options:
OPTION 1 – Make the updates directly via the Administrator Portal by searching for Uncategorized codes.
- Log in to the Administrator Portal.
- From Setup, select Procedures.
- Set the Categorization search filter to Uncategorized, and click Search.

 Tip: Remember the code(s) for step 4, below. Tip: Remember the code(s) for step 4, below.
- Categorize the Code(s).
- Check each code or group of codes of the same modality and anatomy in the first column of the results grid, and click Categorize.
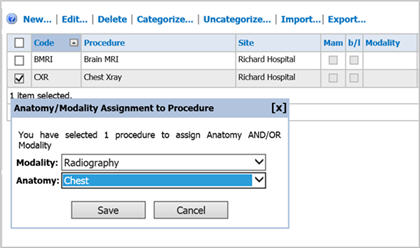
- Select the most appropriate Modality and Anatomy from the drop-down list, and click Save.
- Repeat these steps for each code or group of codes with a different modality and anatomy.
- Assign to Sections.
- Click the Sites tab.
- Choose your site from the drop-down list (if applicable).
- Identify the most appropriate section for the new code, and click the corresponding Edit button in the Procedures column.
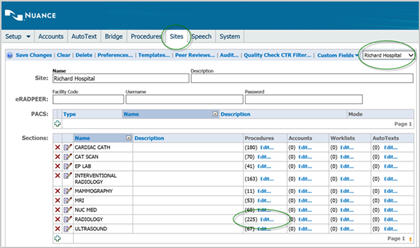
- On the Procedure Code Selection - - Webpage Dialog, search for the code using the Modality and/or Anatomy or Procedure Code/Description search field, and click Search.
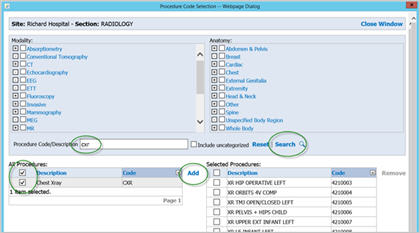 The code should appear in the results grid on the left under All Procedures.
- Check the box of the code to categorize, and click Add. The code should appear in the results grid on the right under Selected Procedures.
- Repeat these steps for each code or group of codes to be assigned to Sections.
- Click Close Window.
OPTION 2 – Enter the updates into your existing PMT file, and import that data via the Administrator Portal. This is especially helpful when you have multiple codes to update.
- Add the new data to the PMT file.
- Save the new PMT file using Save As, and give it a new name that includes the current date. This allows you to keep a history of your PMT files, making it easier to track your changes.

- Send the PMT file to a PowerScribe Optimization Consultant at DiagnosticProServices@Nuance.com to have it validated.
- Import the file into your site via the Setup/Procedures tab in the Administrator Portal.
Either option can be used as the minimal requirements for proper maintenance of your PMT.
Additional Optional Steps
The following additional steps may also be necessary, and may vary by facility:
Assign to:
Procedure Codes No Longer in Use:
If you have procedure codes that you no longer use, instead of decategorizing them (removing their modality/anatomy), we recommend assigning a modality/anatomy combination that is very rarely used. Example: "MEG" modality and "Other" anatomy.
Please submit any questions on this topic to DiagnosticProServices@Nuance.com.
Top
Did you know that you can assign an AutoText(s) to show in My Folders and My Sections View on the AutoText List?
In PowerScribe 360 Reporting v4.0, you can now find your AutoText by sections in the Report Editor window. AutoTexts are assigned to sections by your administrator, or you can assign AutoTexts to folders using the AutoText Editor.
To assign AutoTexts to folders using the AutoText Editor:
- Log into the Client.
- Click the AutoText tab.
- From the List drop-down menu, select a section from the list that you want to display in the AutoText pane.
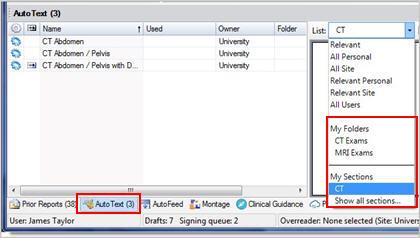
 By default, the section you select appears in the My Sections list. (You can also choose to Show all sections.) By default, the section you select appears in the My Sections list. (You can also choose to Show all sections.)
To Use Your AutoText Folders in Report Editor:
- In the Report Editor, click the AutoText tab on the bottom of the window.
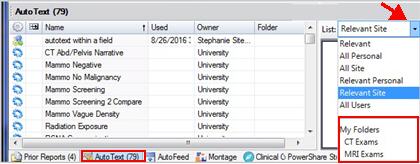
- Click the List drop-down arrow.
- Select one of your folders from the list.
In this example, CT Exams folder is selected.
Only the content of the CT Exams folder now appears in the AutoText pane.

Tip: You can also assign All Personal and Relevant Personal AutoText to a folder from within the Report Editor window.
To assign All Personal and Relevant Personal AutoText to a folder:
- Right-click an AutoText on the Report Editor window.
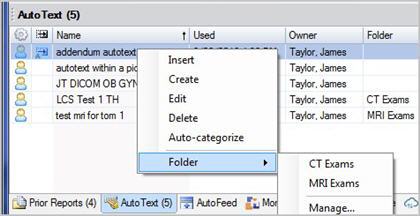
-
Select Folder, and then select the folder where you want to add the AutoText.
To learn more about AutoText, log into the Nuance Healthcare Support Platform, search for Article: 6389 (Oracle 18883) PowerScribe 360 Reporting V4.0 Documentation, and see the Admin Guide L-3906, AutoText Beginning and Advanced section.
Top
Did you know that you can populate Linked Custom Fields in AutoText?
In PowerScribe 360 Reporting v4.0, you can now populate a custom field within a report just once and all instances of that custom field in the report will be populated as well.
Tips for Linked Custom Fields
- You can merge a custom field multiple times into a single AutoText.
- You can merge more than one custom field multiple times into a single AutoText.
- You can utilize pick list options to update merged custom fields.
- Updates to one instance of the custom field updates all instances.
- You can remove one/many/all instances of a custom field from within the Report Editor.
- Merged custom fields do not carry over to different reports.
- Navigation to these fields complies with your personal preference for Merge field navigation.
- When additional instances of a custom field are updated, they are considered modified and are therefore excluded in the Unmodified navigation preference.
Top
Did you know that you can modify the timestamp used in merge field values?
In the System Preferences Workflow Tab, the Merge Field timestamp format allows you to create a uniform Date\Time environment for Merge Fields for all users of the system so that the timestamp presented on the report is accurate.
Tips for Merge Field Timestamp Format Preference
- Available at both the System and Site level with options: Local time; Local time with time zone; Server time; Server time with time zone.
- When set to Server time or Server time with time zone, the client will request the server time from the PowerScribe 360 Reporting server in order to set the merge field. The time zone will be set to the time zone of the server.
- When set to Local time with time zone, the standard 3-character time zone will be appended to the local time.
- Default is Local time.
 Selecting server time versus local time applies only to Merge Fields inserted as part of an AutoText. Text that is automatically inserted into the report (for example, electronic signatures or attending attestation statements) will always use the server time. For these fields, this preference only controls whether or not the time zone is included. Selecting server time versus local time applies only to Merge Fields inserted as part of an AutoText. Text that is automatically inserted into the report (for example, electronic signatures or attending attestation statements) will always use the server time. For these fields, this preference only controls whether or not the time zone is included.
To learn more about merge fields, log into the Nuance Healthcare Support Platform, search for Article: 6389 (Oracle 18883) PowerScribe 360 Reporting V4.0 Documentation, and see the Admin Guide L-3906, Merge Fields section.
|