|
Analytics and AI in Radiology -
mPower™ Webinar

Join us on August 15 to see how analytics can help improve your clinical, operational, and business performance; identify improvement opportunities; and demonstrate value and success.
Woojin Kim, MD, CMIO, will help show why analytics are important in today's radiology environment. He'll use real-life examples about how extracting quality measures and other data from radiology reports can help identify insights that can lead to delivering more value and better care.
We call this doing it right: Thoroughly seeing it through.
We hope you can join us on August 15.
To register for this mPower™ webinar, click here.
Upcoming healthcare events
Check out the upcoming healthcare events.
Nuance Healthcare User Conference & Leadership Summit

Seats are filling up fast for the Nuance Healthcare User Conference & Leadership Summit, March 31 – April 2, 2019 at the Gaylord Opryland Resort. Go to nuance.com/go/nashville19 to register now!
Nuance PowerMic III

We have good news. From now through September 30, Nuance has a special offer* on PowerMic IIIs:
- Buy 4 PowerMics and get 1 free.
- Buy 8 PowerMics and get 2 free.
- Buy 12 PowerMics and get 4 free.
Why PowerMic IIIs? It's simple. Here's what you can expect:
- Advanced, accurate dictation
- Ergonomic operation
- Plug-and-play installation
Contact us today and we'll help you determine how many you need. It's a limited-time offer**—
so contact Nuance at 321-757-8180. We will be happy to get your order started.
* PowerMic III quantities must be in multiples of 4 to receive the special pricing offer.
**Offer expires on September 30, 2018.
Webinar library
You can now stream or download previously recorded Webinars.
Top
This month's eTips
Did you know that in PowerScribe 360 Mobile Radiologist, version 2018.1 you can approve/sign reports as Preliminary?
Mobile Radiologist v2018.1 now support the Preliminary workflow for both attending residents and providers.
Residents can now choose whether or not to send preliminary results when approving a report in Mobile Radiologist.
To choose whether or not to send preliminary results when approving a report in Mobile Radiologist as a Resident:
- From Mobile Radiologist, open the report and select Approve (or Prelim & Approve) drop-down arrow to view the approval selection choices.
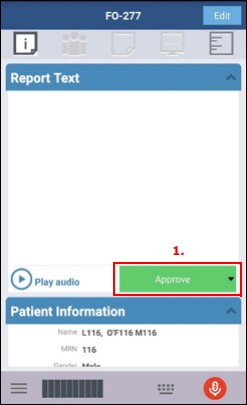
- Select either Approve or Prelim & Approve.
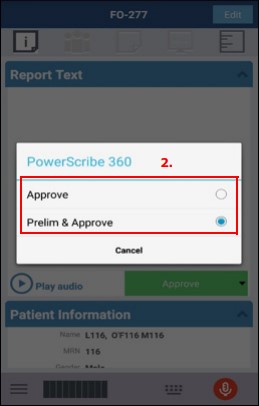
- If you select Prelim & Approve, both approval methods appear on your final screen. For example:
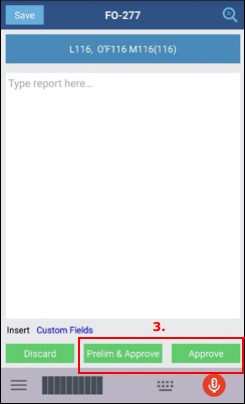
- Select either Prelim & Approve or Approve to sign the report.
 TIP: Admin Portal Requirement: An administrator can access this from the TIP: Admin Portal Requirement: An administrator can access this from the
System > Preferences > Permissions tab, who must set the Resident control of approved reports preference to On demand.
Attending Providers can now sign reports as Preliminary in Mobile Radiologist.
To sign reports as Preliminary in Mobile Radiologist as an Attending Provider:
- From Mobile Radiologist, view your Draft queue, and open a report submitted by a resident.
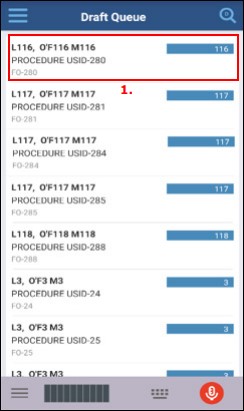
- The Prelim button appears, allowing you to sign the report as preliminary.
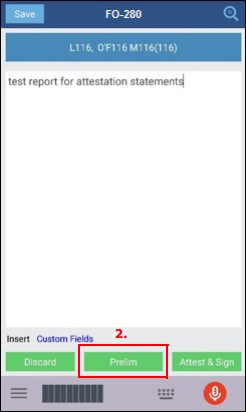
- Select Prelim to sign the report as preliminary.
 TIP: Admin Portal Requirement: An administrator can access this from the TIP: Admin Portal Requirement: An administrator can access this from the
System > Preferences > Explorer Screen tab, and must set the Show old resident drafts in My Reports preference to Show all.
 NOTE: For this feature to work in Mobile Radiologist version 2018.1, your PowerScribe 360 Reporting system must be at version 4.0 or higher. NOTE: For this feature to work in Mobile Radiologist version 2018.1, your PowerScribe 360 Reporting system must be at version 4.0 or higher.
Top
Did you know that you can assign RVUs to procedure codes in your Procedure Master Translator (PMT)?
Your PowerScribe 360 Reporting system uses imported procedure codes, along with modality and anatomy (also referred to as body region) mapping information in many areas.
 TIP: If you attended a PowerScribe 360 Reporting administrator training class, you received an Excel worksheet template that you should use as a starting point. TIP: If you attended a PowerScribe 360 Reporting administrator training class, you received an Excel worksheet template that you should use as a starting point.
Your Procedure Master Translator must include the following columns (the first two columns typically come from the billing system or RIS/HIS):
- Procedure Code: This is a unique identifier of the exam (procedure codes cannot be duplicated in PowerScribe 360 Reporting). You may also know the codes referred to as catalog codes, exam codes, charge codes, or mnemonics. The procedure code information is obtained by analyzing your HL7 message when an order is generated. Determine what the code is and find the source of these codes. Any actively dictated code must be included in this file.
- Procedure Description: This is the description that is listed on the order for the procedure code. This field is limited to 100 characters.
- Category Modality: This is the type of equipment used to conduct the study.
- Category Anatomy: This is the name of the body region involved in the study. Use the most specific appropriate term here. If more than one body region is involved, enter each region separated by a comma.
- Section Name: This is the name your facility uses to describe a modality. Often refers to how your facility’s dictation responsibilities are divided. For example, CT, MR, Neuro, MSK, Peds. In many cases this name could be a department name in your facility. For example, the PowerScribe 360 Reporting system uses Radiography for x-rays; your system might use CR.
- Mammo: If the procedure is a mammography exam that will use BI-RADS codes, enter Yes. Otherwise, leave this field blank.
- Clinical/CPT Code: These are the clinical codes that might already be used in your billing system. If possible, retrieve an export list of those codes.
The illustration below shows an example of what your PMT worksheet should look like.
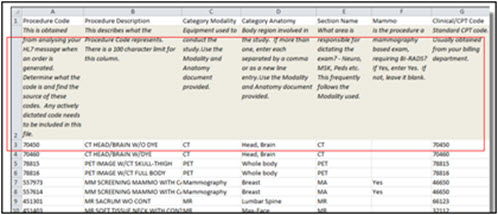
 NOTE: Row 2 of the Nuance worksheet template provided to you contains a description of the content expected in each column. After completing the worksheet, delete row 2 before saving. NOTE: Row 2 of the Nuance worksheet template provided to you contains a description of the content expected in each column. After completing the worksheet, delete row 2 before saving.
Additional Information
You can include the following information (by creating additional columns in your Procedure Master Translator):
- Relative Value Units (RVUs)
- Diagnostic Codes (ICD-9 or ICD-10)
Assigning RVUs
You have the option of assigning professional, technical, and global RVUs to each of your procedure codes for display in the radiologist's dashboard.
 NOTE: If you decide to use RVUs, the Global RVU is a required item. You cannot use Prof and/or Tech without using Global. NOTE: If you decide to use RVUs, the Global RVU is a required item. You cannot use Prof and/or Tech without using Global.
To assign RVUs:
Add the columns Prof RVU, Tech RVU, and Glob RVU to your Procedure Master Translator. Each value must be a decimal number with up to 3 places to the left, and two places to the right of the decimal point.
 NOTE: Providers can see the quota values in the client application dashboard (if a quota is set in the administrator preferences). NOTE: Providers can see the quota values in the client application dashboard (if a quota is set in the administrator preferences).
Top
Did you know that custom words can be added to language models to improve speech recognition?
Adding custom words to your language models can improve speech recognition. Custom words might include place names, or the names of drugs, or persons. For example, if a new drug comes on the market, you can add the drug name to all the language models in your system. Adding words at the system level eliminates the need for providers to add the words themselves.
You can add individual custom words or import a list of words from a file. Importing words saves time when you have many words to import, or when you need to add the same words to more than one language model. You can also delete one or more words. Adding or deleting words from one language model does not affect the others.
To add Custom Words:
- In the Setup group, select the Speech tab.
- Select the language model to which you want to add the word(s).

- Click Add.

The Add Word dialog box opens.
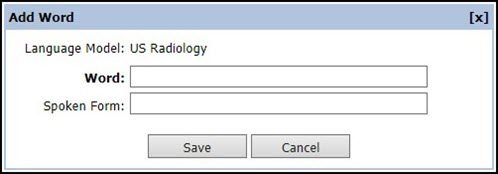
- In the Word field, type the word of phrase you want to add.
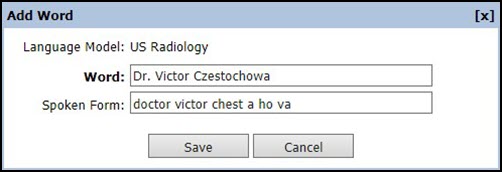
- If desired, spell the word phonetically in the Spoken Form field. That is, spell the word the way it sounds. This helps the speech software to recognize the word when it is dictated. You might want to provide a spoken form for a word that is frequently being mis-recognized, or for a name with an uncommon spelling.
 NOTE: The combined length of the Word and Spoken Form fields cannot exceed 127 characters. NOTE: The combined length of the Word and Spoken Form fields cannot exceed 127 characters.
- Click Save. The word or phrase is saved in the selected language model, and appears in the list along with the date and time in was added.
|