|
Nuance PowerMic III

We have good news. From now through September 30, Nuance has a special offer* on PowerMic IIIs:
- Buy 4 PowerMics and get 1 free.
- Buy 8 PowerMics and get 2 free.
- Buy 12 PowerMics and get 4 free.
Why PowerMic IIIs? It's simple. Here's what you can expect:
- Advanced, accurate dictation
- Ergonomic operation
- Plug-and-play installation
Contact us today and we'll help you determine how many you need. It's a limited-time offer**—
so contact Nuance at 321-757-8180. We will be happy to get your order started.
* PowerMic III quantities must be in multiples of 4 to receive the special pricing offer.
**Offer expires on September 30, 2018.
Upcoming healthcare events
Check out the upcoming healthcare events.
Nuance Healthcare User Conference & Leadership Summit

Just announced: Private event at the Nuance Healthcare User Conference & Leadership Summit to be held at the legendary Grand Ole Opry - featuring behind-the-scenes tours and live entertainment. Don’t miss out on this once in a lifetime opportunity. Use the discount code “Diag19” at checkout to receive $400 off the regular rate of $499. Go to nuance.com/go/nashville19 to register now!
Webinar library
You can now stream or download previously recorded Webinars.
Top
This month's eTips
Did you know that you can register to receive Diagnostic Solutions product and maintenance notifications for PowerScribe 360 Cloud-based products and features?
Nuance launched the Nuance Healthcare Notification Services (NHNS), a communication system that provides Nuance Healthcare, including Diagnostic Solutions (PowerScribe 360), clients with notifications of significant product updates and events by email.
Clients who sign up will be notified of new releases, patches, updates, and maintenance schedules for Cloud based solutions. Please note, to register for the notifications, your site must have purchased the applicable solution. The NHNS notifications for Diagnostic Solutions (PowerScribe 360) include the following:
PowerScribe 360® Clinical Guidance – Clinical Guidance customers can register to receive information about enhancements to Clinical Guidance functionality, new or updated guidelines available for download, advanced notice and schedules for Clinical Guidance upgrades or scheduled maintenance, and immediate notification of unplanned maintenance activities.
PowerScribe 360® Critical Results – Critical Results customers can register to receive information about enhancements to Critical Results functionality, advanced notice and schedules for Critical Results upgrades or scheduled maintenance, and immediate notification of unplanned maintenance activities.
PowerScribe 360® Mobile Radiologists/Clinician – Mobile Radiologists/Clinician customers can register to receive information about enhancements to Mobile Radiologists/Clinician functionality, updates about available iOS and Android Mobile applications, advanced notice and schedules for Mobile Radiologists/Clinician upgrades or scheduled maintenance, and immediate notification of unplanned maintenance activities.
PowerScribe 360® mPower™ (Cloud) – mPower™ (Cloud) customers can register to receive information about enhancements to mPower™ (Cloud) functionality, advanced notice and schedules for mPower™ (Cloud) upgrades or scheduled maintenance, and immediate notification of unplanned maintenance activities.
PowerScribe 360® Quality Check – Quality Check (aka Assure) customers can register to receive information about enhancements to Quality Check functionality, advanced notice and schedules for Quality Check upgrades or scheduled maintenance, and immediate notification of unplanned maintenance activities.
If you are not currently registered to receive Nuance Healthcare Notification Services notifications for your solution, you can follow the steps below:
- Click here to Register to receive NHNS notifications.
The Register (Registration) site displays.
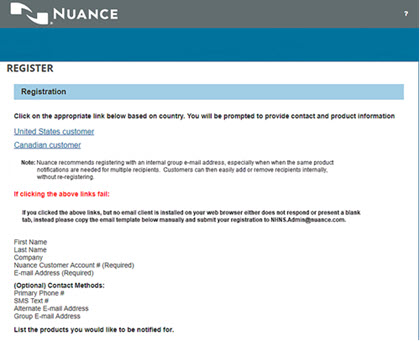
- Log in to the log in to the Nuance Healthcare Support Platform, and search for Knowledge article 6768, Nuance Healthcare Notification Services Registration for Hosted Diagnostic Solutions (PowerScribe 360).
- Complete the registration by filling in the template; following the New User Registration steps, and then submit the email template to: NHNS.Admin@nuance.com.
 NOTE: Include only the hosted Diagnostic Solutions (PowerScribe 360) products for which you want to receive notifications. You can only receive notifications for hosted Diagnostic Solutions (PowerScribe 360) that your facility purchased with an existing Maintenance and Support contract. NOTE: Include only the hosted Diagnostic Solutions (PowerScribe 360) products for which you want to receive notifications. You can only receive notifications for hosted Diagnostic Solutions (PowerScribe 360) that your facility purchased with an existing Maintenance and Support contract.
Top
Did you know that you can map procedure codes to diagnostic codes in PowerScribe 360 Reporting?
PowerScribe 360 Reporting is installed with a master set of both the ICD-9 and ICD-10 diagnostic codes. Each of your procedure codes can be mapped to diagnostic codes to specify valid diagnoses for those procedures.
To map procedure codes to diagnostic codes:
- Add the columns ICDCode and ICDDesc to your Procedure Master Translator spreadsheet.
- Add the diagnostic code information for the procedure codes as needed.
 NOTE: If you have multiple diagnostic codes for one line item, place them in the same cell, using a comma to separate them. NOTE: If you have multiple diagnostic codes for one line item, place them in the same cell, using a comma to separate them.

- Save your Procedure Master Translator spreadsheet.
- Log in to the PowerScribe 360 Reporting Administrator Portal.
- Click Setup > Procedures > Import.
- Select the appropriate site.
- Browse to the Procedure Master Translator spreadsheet you created in steps 1 through 3 above.
- Click Next.

- From the Mapping drop-down lists, select the item that matches your column heading name.
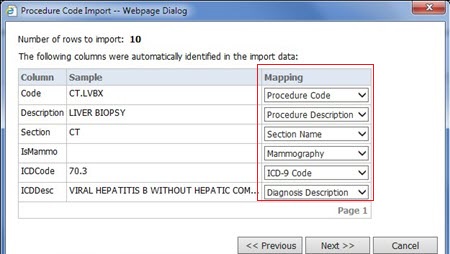
- Click Next.
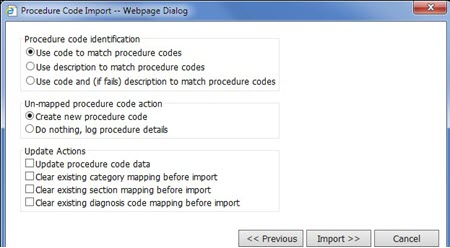
- Click Import.
- At the results screen, review the summary and click Close.
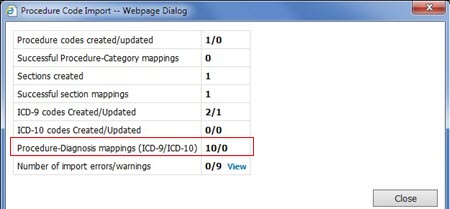
Top
Did you know that you can create a Fill-In Field that references an existing AutoText?
In PowerScribe 360 Reporting version 4.0, you can now create fill-in fields that reference an existing AutoText allowing the referenced AutoText content to be used within the field. You can use either the new AutoText type or the existing Pick List fill-in field type to reference the AutoText.
 NOTE: If a referenced AutoText is deleted or renamed, the reference is no longer valid and the field will be empty when inserted into a radiology report. NOTE: If a referenced AutoText is deleted or renamed, the reference is no longer valid and the field will be empty when inserted into a radiology report.
Using the AutoText Type
- Open the AutoText Editor and either start a new AutoText or open an existing one that you want to modify.
- With your mouse cursor in the AutoText creation area, click the Fill-in button to open the Fill-in Field Definition dialog box.
- Give the fill-in field a name, and from the Type list, select AutoText.
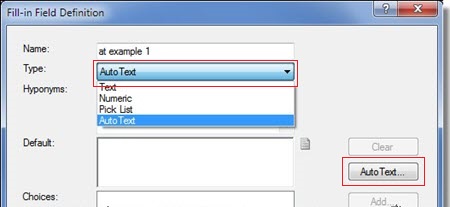
Notice that the AutoText button on the right becomes active.
- Click the AutoText button to open the AutoText Search dialog box.
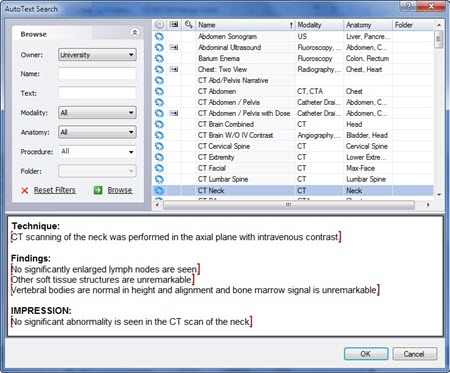
- Using the Browse section, search for and select an AutoText. The AutoText content opens in the preview section (bottom) of the dialog box.
 NOTE: The AutoText Search displays only AutoTexts that do not contain references to other AutoTexts. NOTE: The AutoText Search displays only AutoTexts that do not contain references to other AutoTexts.
- When finished, click OK to place the selected AutoText into the Default portion of your fill-in field definition.
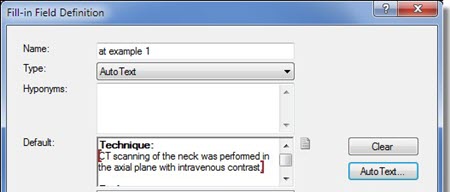
- Click OK to return to your AutoText Editor.
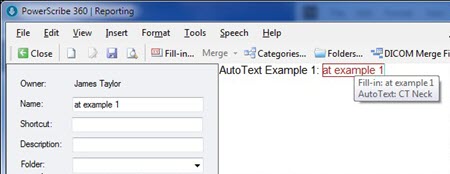
The fill-in field definition you just created appears in your AutoText at your cursor location. Placing your mouse cursor over the field displays the type and content.
Top
Did you know that you can assign values to custom fields using the administrator portal?
Assigning values to custom fields may be very useful for reporting and can alleviate the radiologist from having to dictate exam measurements.
Editors and technologists can use the PowerScribe 360 Reporting Administrator Portal to assign values to custom fields on unreported orders.
Administrators can assign values to custom fields at any time using the administrator portal.
The portal view differs depending on the role of the user (i.e., whether the user is an editor, technologist or administrator). An administrator can populate or change custom fields at any stage of reporting, even after the report is final.
Assigning Custom Fields as an Editor or Technologist
- As an editor or technologist logged into the portal, search for the applicable exam under the Explorer tab. Select the Custom Fields tab and click Insert Custom Fields.
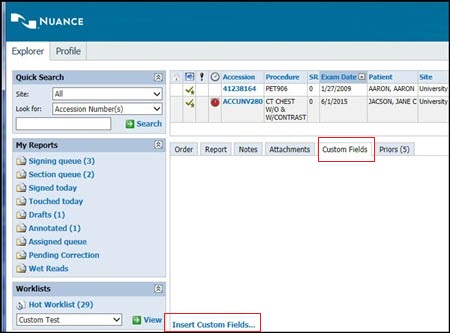
The Order Custom Fields dialog displays. 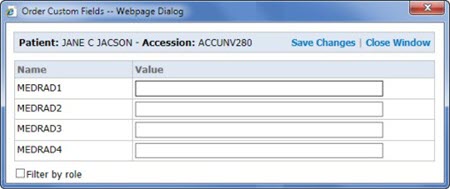
- Click the Value field to assign a value to the custom field.
- If applicable, select the Filter by Role check box.
- When finished populating the custom fields for your report, click Save Changes and Close Window.
Assigning Custom Fields as an Administrator
- Log in to the portal as an administrator, search for and select the applicable exam under the Explorer tab.
- Click Actions and select Edit Custom Fields,
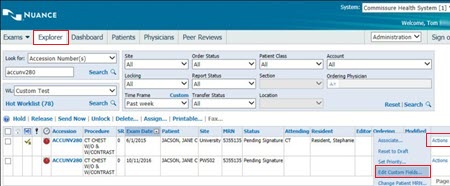
The Order Custom Fields dialog displays.

- Click the Value field to assign a value to the custom field.
- When finished populating or changing the custom fields, click Save Changes and
Close Window.
|