|
Nuance PowerMic III

We have good news. From now through September 30, Nuance has a special offer* on PowerMic IIIs:
- Buy 4 PowerMics and get 1 free.
- Buy 8 PowerMics and get 2 free.
- Buy 12 PowerMics and get 4 free.
Why PowerMic IIIs? It's simple. Here's what you can expect:
- Advanced, accurate dictation
- Ergonomic operation
- Plug-and-play installation
Contact us today and we'll help you determine how many you need. It's a limited-time offer**—
so contact Nuance at 321-757-8180. We will be happy to get your order started.
* PowerMic III quantities must be in multiples of 4 to receive the special pricing offer.
**Offer expires on September 30, 2018.
Upcoming healthcare events
Check out the upcoming healthcare events.
Nuance Healthcare User Conference & Leadership Summit

Don't miss out on the Nuance Healthcare User Conference & Leadership Summit, March 31 – April 2, 2019 at the Gaylord Opryland Resort.
Register today using the code "Diag19" at checkout to receive $400 off the regular price of $499.
Go to nuance.com/go/nashville19 to register now!
Webinar library
You can now stream or download previously recorded Webinars.
Top
This month's eTips
Did you know that Nuance has incorporated customer feedback and leveraged the industry standard features to improve the Nuance Healthcare Community (aka Nuance Healthcare Support Platform)?
Nuance launched the updated Nuance Healthcare Community user interface (UI) on September 13, 2018.
To log in or to register, you can click here.
We would like to point out the updates in the screen capture below made to the NEW Nuance Healthcare Community user interfaces (UI):
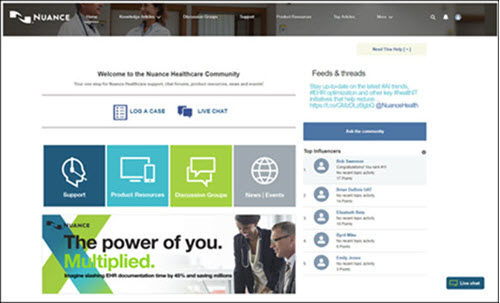
At the top, the frequently used items have been placed in a Navigation menu and available on all the pages.

The Navigation menu includes the following:
- Home returns you to the Community login page.
- Knowledge Articles replaced the Topics list selection but all the Nuance solution remained the same.
- Discussion Groups replaced the Groups list area. The same groups that existed prior to the update of the UI still exist.
- Support replaced the Contact Support area and takes you to the new cases area where you can see the cases, log a case, or use live chat to speak with a technical support representative.
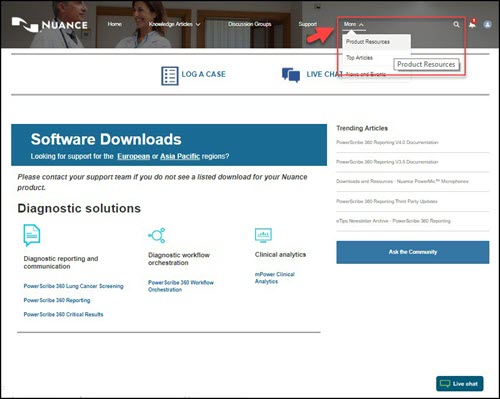
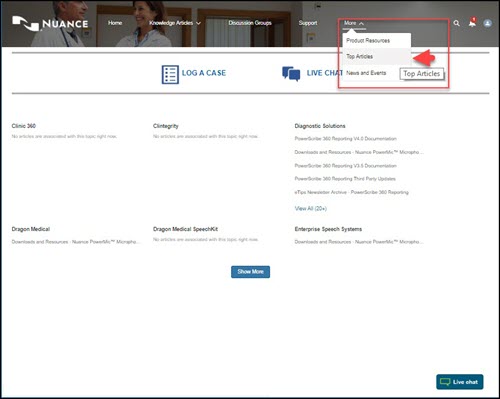
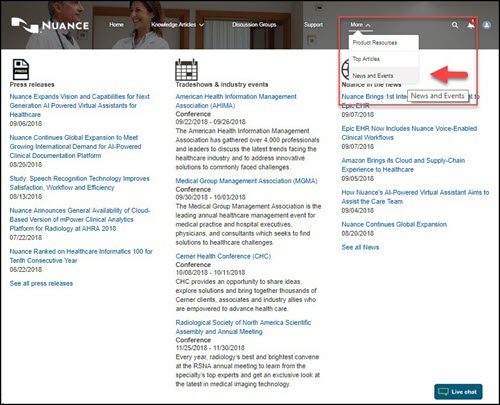
- More provides access to Product Resources (software downloads), Top Articles, and Nuance News and Events.
- Search icon dynamically expands when clicked to let you enter the search criteria.
- Notification icon has remained the same (no change).
- User Account icon has remained the same (no change).
 The new Technical Support area lets you log a LOG A CASE or see your existing cases. You can also speak to a representative through LIVE CHAT. The new Technical Support area lets you log a LOG A CASE or see your existing cases. You can also speak to a representative through LIVE CHAT.

 The new Support
channels area provides quick and easy access to: The new Support
channels area provides quick and easy access to:
- Support
- Product Resources
- Discussion Groups
- News | Events

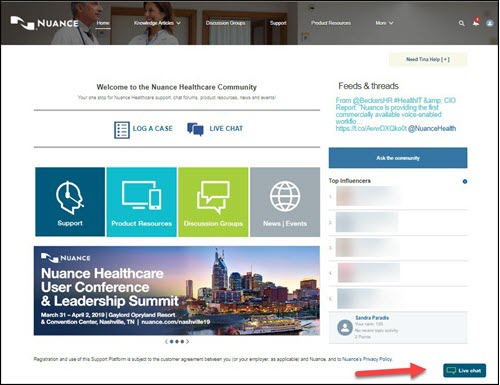
 Live chat access is now available on the lower right-hand side of every Nuance Healthcare Community page. Live chat access is now available on the lower right-hand side of every Nuance Healthcare Community page.
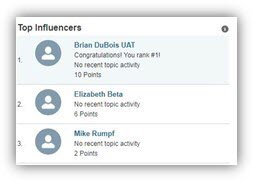
 The Top Influencers area has been added and shows the most active Community
members. These Top Influencers may be valuable resources for answers to your
questions. The Top Influencers area has been added and shows the most active Community
members. These Top Influencers may be valuable resources for answers to your
questions.
 The Feeds and Threads
/ Informational Highlights areas provide the latest active discussions in the Nuance Healthcare Community from your peers, and the latest Nuance promotions, special events, and current Nuance news, respectively. The Feeds and Threads
/ Informational Highlights areas provide the latest active discussions in the Nuance Healthcare Community from your peers, and the latest Nuance promotions, special events, and current Nuance news, respectively.
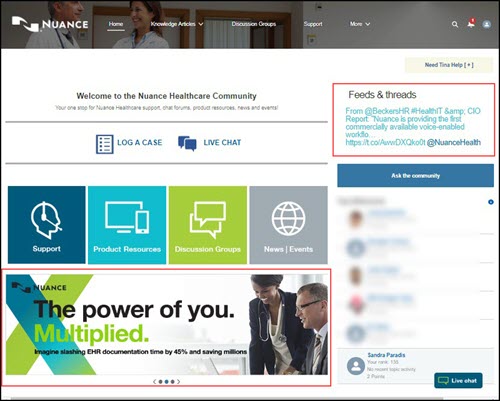
 The More area provides access to the following: The More area provides access to the following:
For additional details about the new Nuance Healthcare Community UI, search for Knowledge Article 6495: Nuance Healthcare Community Platform Navigation.
Additional knowledge articles of interest about the Nuance Healthcare Community include:
- 6653: Contacting Product Support for Diagnostic Solutions
- 6536: Creating a Diagnostic Solutions Support Case
- 2761: Submitting a Diagnostic Solutions Feature Request (Product Enhancement)
- 6656: Requesting Updates for Support Case(s) (Service Requests)
- 6655: Checking the Status of Support Cases (Service Request)
- 6493: Live Agent Chat on Nuance Healthcare Community
- 6494: Nuance Healthcare Technical Community Article Library
- 6769: Nuance Healthcare Support Platform Registration
- 6708: PowerScribe 360 Product Information Available on the Nuance Healthcare Community
Top
Did you know that you can configure BI-RADS codes in PowerScribe 360 Reporting?
You can configure the BI-RADS codes and the text of the corresponding BI-RADS statements that appear on mammography reports.
Only a single BI-RADS code can be assigned to a study. If you need to use codes that represent follow-up recommendations, you should use custom fields for both BI-RADS codes and any other codes, rather than using the feature described in this eTip.
To create a BI-RADS code:
- Select the System tab in the Setup group.
- Click BI-RADS....
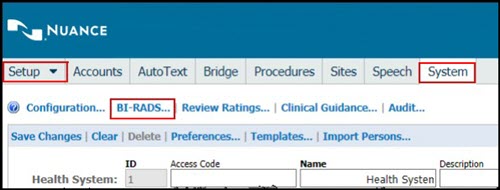
The BI-RADS Codes dialog displays. 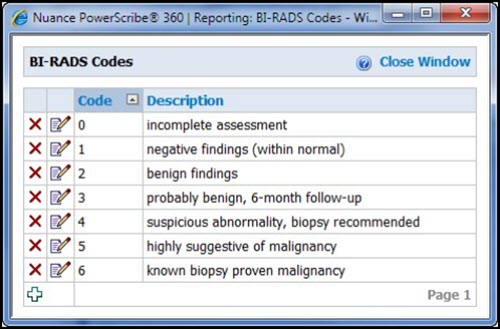
- Click the
 plus sign icon. A new row is added to the table. plus sign icon. A new row is added to the table.
- Type the code and description.
- Click the Save icon to save your changes.
To edit a BI-RADS code:
- In the Setup group, select the System tab.
- Click BI-RADS.... The BI-RADS Codes dialog displays.
- Click the
 Edit icon of the code you want to modify. The code and description are opened for editing. Edit icon of the code you want to modify. The code and description are opened for editing.
- Type your changes to the code, description, or both.
- Click the Save icon to save your changes.
To delete a BI-RADS code:
- In the Setup group, select the System tab.
- Click BI-RADS.... The BI-RADS Codes dialog box opens.
- Click the
 Delete icon of the code you want to delete. A confirmation message Delete icon of the code you want to delete. A confirmation message
appears.
- Click OK to delete the item.
Top
Did you know that you can view and print audits of user activity?
The Accounts tab of the Setup group allows you to monitor activity by the users in your system. The Account Events window shows such activities as password changes, deactivation of users, and changes to preferences.
LMO and ACO events appear in the Account Events window only when they are successful. Any failed LMO or ACO processes appear in the Exception tab in the Logs group. To see all activity on the Speech Utility Server, refer to the ACO/LMO tab in the Logs group.
To view the audit log:
- Find the user account whose events you want to audit. Refer to Searching for Existing Users in the Administrator Guide for your system.
- With the user account displayed, click Audit. The Account Events window opens, and displays all activity for this user.
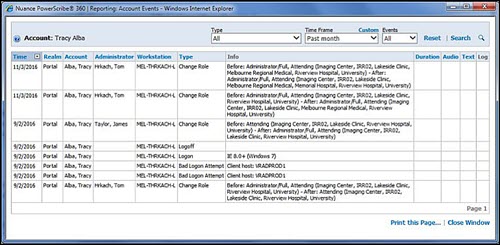
- If desired, select one or more criteria by which to filter the events list:
- Select an event type from the Type drop-down list. The table below shows the available event types.
| Create
| The account is added to the system.
|
| Delete
| The account is removed from the system. |
| Change password
| The user assigns a new password to the account.
|
| Change role
| The administrator modifies the role(s) that define this user’s system access.
|
| Log on
| The user signs on to the system.
|
| Log off
| The user signs off the system.
|
| Activate
| The administrator reinstates an inactive account.
|
| Deactivate
| The administrator makes the account inactive.
|
| Reset speech
| The administrator performs a checkpoint restore. For this event, the Info column indicates whether the entire profile is restored, or just the acoustics.
|
| Checkpoint speech
| The user creates a checkpoint (backup of the current speech profile), or the system creates one automatically after the user performs training.
|
| Bad logon attempt
| The user entered an incorrect user name or password.
|
| Change preferences
| The user or administrator changes one or more preferences that affect the account.
|
| Set speech to mock profile
| The administrator creates a profile from the prototype.
|
| Delete speech profile
| The administrator removes the user’s profile.
|
| Set speech language
| The administrator assigns a language model to the account.
|
| Set speech acoustics
| The administrator assigns an acoustic model to the account.
|
| Delete speech acoustics
| The administrator selects Reset acoustics and retrain from the Roaming Profile menu.
|
| Optimize speech acoustics
| The ACO process runs for the account.
|
| Optimize speech language
| The LMO process runs for the account.
|
| Import speech vocabulary
| The PowerScribe 360 Reporting client application detects new words and adds them to the user’s profile.
|
| Train speech
| The user used the train speech function.
|
| Change Username
| An administrator changed the user name in a user’s profile.
|
| Change Personal Info
| An administrator changed the personal information in a user’s profile.
|
| Change Admin Rights
| An administrator changed the Administrator rights in a user's profile.
|
| Change Sections
| An administrator changed the Sections information in a user’s profile.
|
| Change Supervisors
| An administrator changed the Supervisors information in a user’s profile.
|
| Change Specialties
| An administrator changed the Specialties information in a user’s profile.
|
| Launch PowerShare study
| The user accessed the PowerShare site to view a study.
|
- Select a period of time from the Time Frame drop-down list. Or, to enter a date range, click Custom, select the start date from a calendar to insert it in the first text box. Then click the second text box and select an end date from the calendar. To revert back to choosing a time frame from a list, click List.
- Select All, Admin, or Account from the Events drop-down list. If you select Admin, the search retrieves events caused by an administrator, such as a change to a preference, or the deactivation of a user account.
- Click Search to filter the events by your criteria. Only the events that meet your criteria are shown.
If the search yields more than one page of results, click the page number at the bottom right corner of the grid to navigate to a specific page. To view the entire list, click the small down arrow at the right of the page number list. The arrow then reverts to an up arrow; click the up arrow to see the results one page at a time.

The table below describes each of the columns in the Account Events window.
| Time
| The time of day when the event occurred.
|
| Realm
| The application that was running when the event occurred. |
| Account
| The first and last name of the account owner.
|
| Administrator
| The administrator who acted on the account in the Administrator Portal, if applicable.
|
| Workstation
| The identifier of the computer where the event occurred.
|
| Type
| The event; for example, “Log off” or “Change password.”
|
| Info
| Information about the changes made. For example, if the event is a change to a user preference, this column shows the preference before and after the change.
|
| Duration
| The time it took to complete an acoustic or language model adaptation.
|
| Audio
| The length of the audio used in an acoustic or language model adaptation.
|
| Text
| The number of characters in the text used in an adaptation.
|
| Log
| Contains a link to the zipped Dragon log for an adaptation.
|
 Tip: Click on any column heading to sort the list; click the heading again to sort in reverse order. Tip: Click on any column heading to sort the list; click the heading again to sort in reverse order.
You can send a copy of the audit log for a particular user to a printer on your network.
To print the audit log:
- With the audit log displayed, click Print this page…. A standard Print dialog displays.
- Select the printer you want to use. To ensure that all the columns appear on the page, be sure to select landscape mode in the printer's properties.
- Click Print. The log is sent to your printer.
Top
Did you know that you can assign unreported orders to a radiologist?
You can assign an unreported order to a radiologist. Assigned orders appear in the Assigned queue under My Reports from the Explorer page in the PowerScribe 360 | Reporting client.
To assign an order:
- From the PowerScribe 360 Reporting client Explorer page, select an unreported order to assign.
- Click Tools > Assign. The Assign Orders dialog box opens.
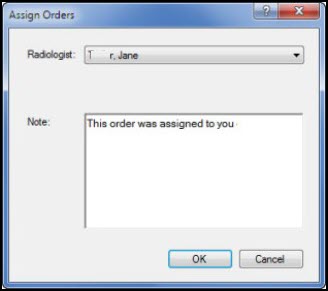
- Select a radiologist from the drop-down list; the note is optional.
- Click OK to assign the selected order.
|