|

We are pleased to offer you an opportunity to trade in your PowerMic IIs and purchase new PowerMic IIIs at up to 30% off the regular price.
Call us today at 321-757-8180 to speak with a sales associate who will be happy to get your order started.
Don't delay. This limited-time offer ends on December 31, 2018.

Last year at RSNA, we spoke about Nuance innovations in AI and machine learning that support your goal of providing better patient care and an enhanced role for radiology within the healthcare organization.
If you're going to RSNA in November, Schedule a demo or meeting today and discover how the Nuance portfolio of AI-powered imaging solutions empowers radiologists. Our RSNA sessions fill up quickly, so click here or call us at 800-255-4641 to schedule a demo today. Nuance professionals will be on hand to guide you through demos, answer your questions, and ensure you are fully immersed in our newest technology.
Upcoming healthcare events
Check out the upcoming healthcare events.
Nuance Healthcare User Conference & Leadership Summit

Don't miss out on the Nuance Healthcare User Conference & Leadership Summit, March 31 – April 2, 2019 at the Gaylord Opryland Resort.
Register today using the code "Diag19" at checkout to receive $400 off the regular price of $499.
Go to nuance.com/go/nashville19 to register now!
Webinar library
You can now stream or download previously recorded Webinars.
Top
This month's eTips
Did you know that you can create a site administrator account in PowerScribe 360 Reporting?
You can configure a user as either a system administrator or a site administrator.
A system administrator has access to all sites in the system. Create a site administrator if you want to limit the user's administrative rights to specific sites. Both administrator types contain the same set of privileges from which you can select.
Administrators cannot edit their own administrative rights. If there is a need for an administrator's rights to be modified, another administrator must edit the account.
To create a site administrator account:
- In the Setup group, click the Accounts tab.
The left side of the window lists all the users in the system, and the right side displays a form you can use to create a new user. Note: If a user's information already appears on the right, click Clear. Clear simply removes the data from the window; it does not delete the user from the system.
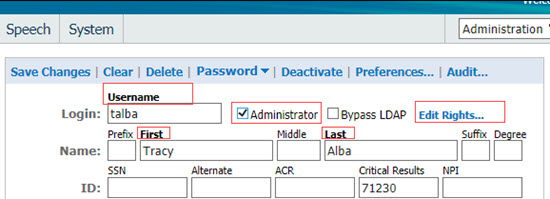
- Enter a Username (not case sensitive) and Password (case sensitive) for the user.
Tip: If your system is configured to require users to change their passwords at their first login (that is, if the Setup > System > Preferences > Security tab > Forced password change interval preference is set to anything other than
Never), consider creating a basic password for all users to use at first, allowing
each user change to a more secure one at first login.
- Enter a First name and a Last name for the user.
Note: The field names labeled in bold text (Username, Password, First, and Last) are required fields. All other fields are optional.
- Check the Administrator box.
- Optional: Fill in the ID, Contact, and Address information for the user.
- Click the Create New link to save the user account. (The Create New link changes to Save Changes.) You can now edit the administrator's rights.
- Click the Edit Rights link, to the right of the Administrator box. The Administrative Rights dialog opens by default, the System Administrator user type is selected.
To create a site administrator:
- Click the Site Administrator button, and open the site you want to configure by clicking the open icon at the far-right side of the site name.
In the illustration below, the Imaging Center site is open for editing. Lakeside Clinic, Riverview Hospital, and University are available for configuration as well.
Initially, No access is selected for all sites to prevent unintended access. 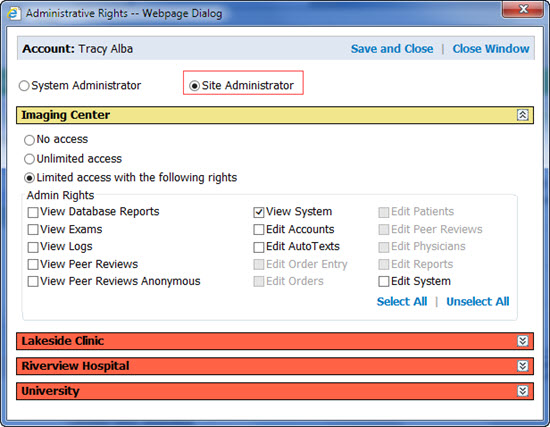
Note: For View Exams, View Peer Reviews, and View System, you must first select the View right before the Edit rights become available. For example, when you select View System, the Edit Accounts, Edit AutoTexts, Edit System, and Edit Worklists selections become available. In other words, you must have View rights before you can have Edit rights. This applies to both System and Site administrator accounts. 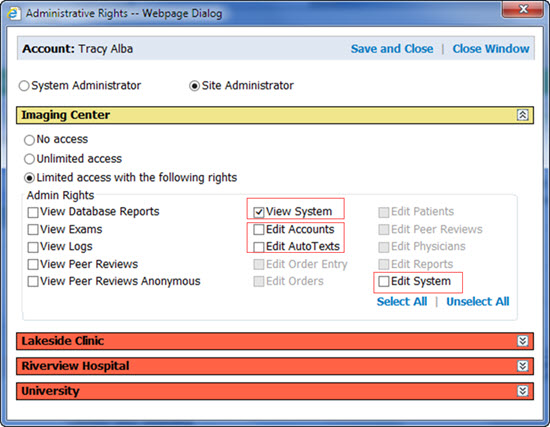
- To limit an administrator's rights, select the Limited access with the following rights option.
Note: The Admin Rights fall into two categories, View Rights, and Edit Right.
-
Select the user's rights, referring to the following tables:
| View Database Reports
| Allows access to Reporting Services.
|
| View Exams
| Allows read-only access to Explorer, Dashboard, Patients, and Physician pages. |
| View Logs
| Allows read-only access to Communications, Exceptions, Statistics, Bridge, and ACO/LMO pages. |
|
|
|
| View Peer Reviews
| Allows read-only access to Peer Reviews page. |
| View Peer Reviews Anonymous
| Allows read-only access to Peer Reviews page, prevents display of radiologist names (reviewers and reviewees) and disables report preview, unless the user has the View Exams right. In the latter case, the report data are available, but not the reviewer. |
| View System
| Allows read-only access to System, Sites, Bridge, Accounts, Speech, and AutoText pages.
|
|
|
|
| Edit Accounts
| Allows managing user accounts.
(You must first select the View System right.)
Note: Only system administrators can edit Accounts; site administrators have view-only rights. |
| Edit AutoTexts
| Allows managing site and account AutoText.
(You must first select the
View System right.)
Note: Only system administrators can edit AutoText; site administrators have only view and export rights. |
| Edit Order Entry
| Allows managing order entry requests, including authorization.
(You must first select the View Exams right.) |
|
|
|
| Edit Orders
| Allows editing order properties (for example, priority) and metadata that are order-related, like custom fields. It also allows deleting unreported orders and unlocking orders.
(You must first select the View Exams right.) |
| Edit Patients
| Allows editing patient data.
(You must first select the View Exams right.) |
|
|
|
| Edit Peer Reviews
| Allows managing peer reviews, including verifications and transmissions to the ACR.
(You must first select the View Peer Reviews right.) |
|
|
|
| Edit Physicians
| Allows editing physician data.
(You must first select the View Exams
right.) |
| Edit Reports
| Allows editing report properties (for example, resetting the status to Draft or associating/dissociating orders to or from a report) and metadata that are report-related, like diagnosis (ICD-9) codes. It also allows changing or resetting the radiologist and transcriber of a report, assigning orders to radiologists, deleting a report, and holding/resending a report.
(You must first select the View Exams right.) |
| Edit System
| Allows editing global system, site and Bridge properties, preferences, and general configuration. Allows access to the Speech tab in the Setup group. (You must first select the View System right for the administrator to use this right.)
Note: Only system administrators can edit system-level items; site administrators do not see the System tab at all. However, site administrators can add and manage items on the Bridge tab. |
| Edit Worklists
| Allows creating and editing worklists.
(You must first select the View System right.)
Note: Only system administrators can edit worklists; since worklists appear on the System tab, they are not available to site administrators. |
|
|
|
- To give the administrator full rights, select the Unlimited access to all system functions option. This option gives the user all the rights shown in the Admin Rights group box below, as well as any other administrative rights. Select this option if you want no limits to this user's rights.
Caution: It is recommended that you NOT select this option, but rather assign administrators only the specific rights they need.
- When finished, click Save and Close.
Top
Did you know you can edit a report in a 'Ready' transfer status when the Report Transmit Grace Period option is configured?
Many customers configure their PowerScribe 360 Reporting system to allow providers a specific amount of time during which they can recall a report for further dictation or editing before it is uploaded to their RIS.
With this feature enabled, a provider can retrieve a report from their Signed today queue if it has a Report Transfer Status (the column with the  icon) of Ready, indicated by a single green arrow icon) of Ready, indicated by a single green arrow  . .
To open and edit a Ready report:
- From the Explorer window, click the Signed today link under My Reports.
- In the results grid, find the report you want to revise, making sure it is in the Ready
 state. state.
- Double-click the report to open it in the Report Editor.
- Make the necessary revisions and sign the report once again.
If a provider double-clicks a report that has any other transfer status (Queued  , Sent , Sent  , and so on), they see the following message box: , and so on), they see the following message box: 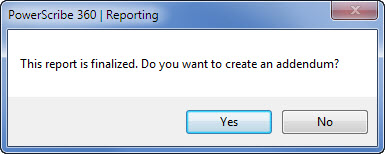
In these cases, the provider must create an addendum to the report in order to make changes or add to it.
Top
Did you know you can sign a report as an attending provider from a resident's workstation?
If your PowerScribe 360 Reporting system administrator has selected a specific permission for your site (Allow attending signoff on resident login), an attending provider can sign a report from your workstation while you are logged into the workstation.
To have an attending provider sign a report from your workstation:
- In the Explorer window, select the report you want the provider to sign. (Or you can open the report in Report Editor if you choose.)
- If you need to do so, click Tools > Change Attending and select the attending provider who is about to sign your report.
- Select the Shift key and click the Approve button (or press Shift+F12). The Confirm Password dialog box displays with the attending provider's name shown next to the words Confirm for, for example:
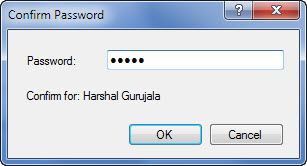
- Have the attending provider enter the password, and click OK.
|