|

We are pleased to offer you an opportunity to trade in your PowerMic IIs and purchase new PowerMic IIIs at up to 30% off the regular price.
Call us today at 321-757-8180 to speak with a sales associate who will be happy to get your order started.
Don't delay. This limited-time offer ends on December 31, 2018.
Nuance Healthcare User Conference & Leadership Summit

Don't miss out on the Nuance Healthcare User Conference & Leadership Summit, March 31 – April 2, 2019 at the Gaylord Opryland Resort.
Register today using the code "Diag19" at checkout to receive $400 off the regular price of $499.
Go to nuance.com/go/nashville19 to register now!
Webinar library
You can now stream or download previously recorded Webinars.
Top
This month's eTips
Did you know that you can search and see which custom words have been added to or deleted from the Language Models?
As a system administrator adding custom words to your language models can improve speech recognition. Adding words at the system level eliminates the need for providers to add the words themselves using the vocabulary editor.
Words can be added at the system level individually or using a list to import multiple words from a file. Words can also be deleted from Language Models at the system level. It is important to note that words that get added or removed from one Language Model do not affect other Language Models in the system.
To Search for custom words in a language model, follow the procedure below on the PowerScribe® 360 Reporting Administrator Portal:
- In the Setup group, select the Speech tab.
- Select the language model.
- To see all the words in the selected language model, click All.
OR
Select a letter in the alphabet to see words beginning with that letter.
OR
Use any of the search criteria to find the word:
- In the field to the right of Word Actions, type all or part of the word or its phonetic spelling.
- From the Time Frame field, select the period of time in which the word was added, if you know it. Or, click Custom and enter a specific date range.
- If you know which administrator acted on the word, select the Administrator from the drop-down list.
- From the Word Actions drop-down list, you can select All to see all the words, select Additions to see words that were added, or select Deletions to see words that were
deleted.

- Click Search. Any words that meet the criteria appear in the list at the right. You can click on the Word, Spoken Form, or Date heading to sort the list by the selected column; click the column heading again to reverse the sort order.
Top
Did you know you can use the PowerScribe® 360 Reporting Administrator Portal to see if dictators are successfully going through ACO and LMO?
If a dictator reports that there are issues with recognition accuracy, one step that can be taken is to ensure ACO and LMO have completed successfully for that dictator's profile.
To view an individual dictator’s ACO and LMO activity:
- In the Setup group, select the Accounts tab.
- Select the dictator whose LMO and ACO activity you want to view.
- Look at the lower-right portion of the dictator’s profile screen. You can see the last time a dictator was processed through ACO/LMO.
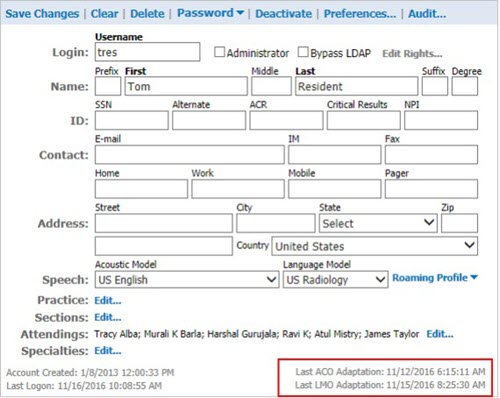
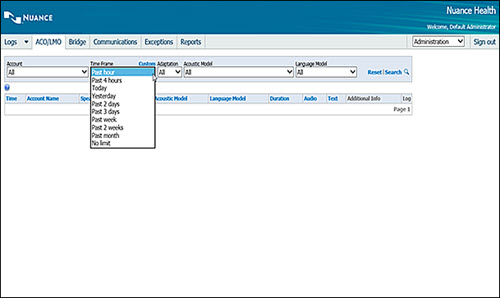
To see a more granular view of all accounts that have processed through ACO and LMO:
- Log in to the PowerScribe® 360 Reporting Administrator Portal.
- On the menu bar, select Logs.
- On the menu bar, select ACO/LMO.
- From the Time Frame list, select the time interval.
- Click Search.
 Everyone will not process ACO and LMO every time it is scheduled. Processing will depend on the amount of data collected and how much of that data is applicable to ACO or LMO. Everyone will not process ACO and LMO every time it is scheduled. Processing will depend on the amount of data collected and how much of that data is applicable to ACO or LMO.
Top
Did you know you can manually categorize procedure codes in the PowerScribe® 360 Reporting Administrator Portal?
If you need to categorize only a few codes, you can select a code through the PowerScribe® 360 Reporting Administrator Portal and categorize it manually.
To categorize procedure codes:
- Search for one or more procedure codes. In the Setup group, select the Procedures tab.
- Search for the code you want to edit. To narrow your results, use the search filters in the left portion of the window:
- Site: From this drop-down list, select one or more sites.
- Categorization: Choose Uncategorized, No Modality, No Anatomy, or All.
- Mammography: Choose Set, Not Set, or All.
- Bilateral: Choose Set, Not Set, or All.
- Global RVU: Choose Set, Not Set, or All.
- Usage: Choose Never, At least once, or All.
- Look for: Type the first few letters of the procedure code, followed by an asterisk * (which acts as a wild-card character).
 These filters are additive, which means that if you select an item from more than one filter, both (or all) of the criteria will be considered, possibly reducing the number of results. These filters are additive, which means that if you select an item from more than one filter, both (or all) of the criteria will be considered, possibly reducing the number of results.
- Modality and Anatomy lists: These two areas are separate from the filters mentioned above and have their own Search button. Make one or more selections to locate the procedure you want to edit. As shown in the note above, both these lists are additive as well.
- Click the Search link. The codes that meet your criteria appear in the list.
- From the search results list that appears, select the code, or codes, that you want to
categorize.
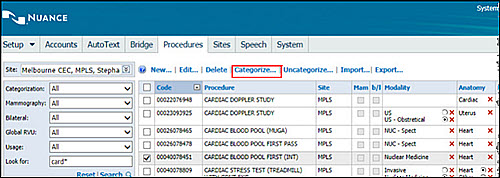
 Select more than one code to assign the same modality and anatomy to multiple codes. Select more than one code to assign the same modality and anatomy to multiple codes.
-
Click the Categorize link. The Anatomy/Modality Assignment to Procedure dialog box opens.
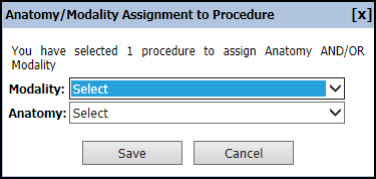
- Make your selections from the Modality and/or Anatomy drop-down lists. (These lists are quite extensive; use the scroll bar to move through the entire list.)
 The items in the Modality and Anatomy lists come from the PowerScribe® 360 Reporting system. The items in the Modality and Anatomy lists come from the PowerScribe® 360 Reporting system.
-
When finished, click Save to save your changes.
Top
Did you know that Nuance has improved the PowerScribe® 360 Version 4.0 Documentation launch pad article to provide an improved experience to better serve our customer needs?
The Nuance Support Team has been updating the V4.x documentation launch pad article to provide you an improved experience when searching for content from the Nuance Healthcare Community.
When you access the content from the new V4.0 article, you will notice that an extra click is required to get to the documents because you will be taken to separate knowledge articles for that content.
Each new knowledge article that is launched from the V4 article contains:
- Article Number
- Title/URL Name/Summary/Question/Answer
- Link(s) to launch the document(s)
- Publish date(s) for the document(s)
- Attachment(s) of the listed document(s)
An example of the new knowledge article changes is noted below:
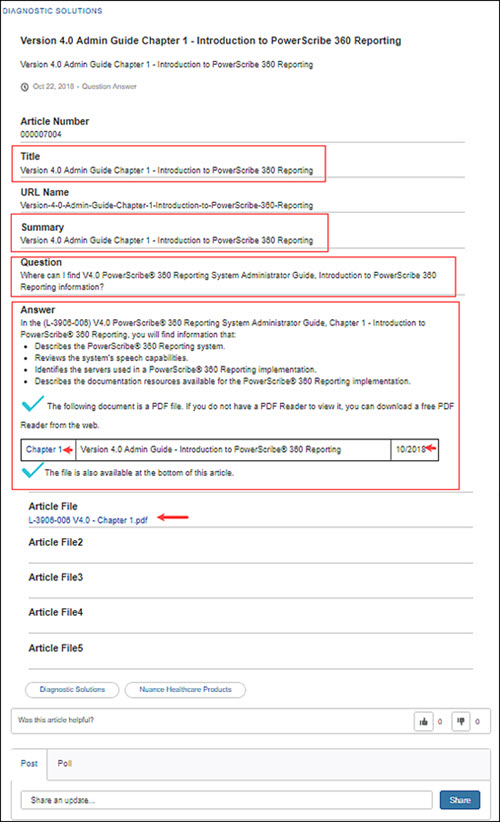
These reorganized articles are being implemented so that you will be able to more easily locate information, and also provide your input indicating whether the content was useful or not and associate the actual document / article to your support cases.
This feedback will be used to help us help you and improve our understanding of what information is used the most and is the most helpful.
As an alternative, you will also be able to search for an article, document or content directly from the search area without going through the launch pad article.
We look forward to your feedback, so we can continue to improve the knowledge management within the Nuance Healthcare Community.
We are currently working to provide the same experience for the V3.5 launch pad article. You can expect to see this updated in the very near future.
|