|
This Month's eTips
Top
Dragon Medical One General User Options Explained
General User Options within Dragon Medical One are explained below.
Access the General User Options from the DragonBar:

Click  and select Options from the Options menu. Click General. and select Options from the Options menu. Click General.
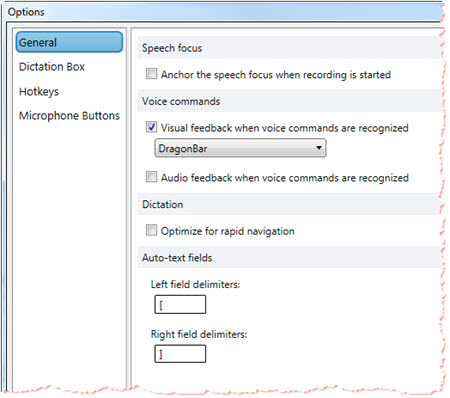
Speech Focus
Anchor the speech focus when recording is started
Voice Commands
Visual feedback when voice commands are recognized
You can enable visual feedback when a voice command is recognized. Select one of the following anchor points from the drop-down menu:
- DragonBar - The voice command bubble is anchored to the Dragon Medical One user interface.
- Mouse - The voice command bubble is anchored to your mouse cursor.
- Text - The voice command bubble is anchored to your text cursor.
- System Tray - The voice command bubble is anchored to the System Tray.
Audio feedback when voice commands are recognized
You can enable playback of a short, audible ring whenever a voice command is recognized.
Dictation
Optimize for rapid navigation
To improve performance in a fast-paced dictation environment, enable this option if you speak quickly and navigate rapidly through sections in a form within your target application.
Auto-text Fields
Left and Right field delimiters
Auto-texts can contain fields. Fields are gaps in the auto-text where you can enter specific text, for example, patient data. To add a field to an auto-text, enter [ ] in the relevant place of the auto-text's contents; you can enter any text between the field delimiters as default content.
For example:
CBC results [within normal limits], vital signs [within normal limits].
When you insert the auto-text, you can decide whether you want to replace the default values with specific text or use the default values.
By default, fields are indicated by square brackets [ ]. You can change the characters used as field delimiters. However, any previously defined fields using different delimiters will then no longer work. Do not use { } or | as field delimiters
To learn more and to keep current with any changes to this topic, review this topic within the Dragon Medical One client's Help resource.
Top
Select & Say Voice Commands for Dragon Medical One
Text Selection Voice Commands
Dragon Medical One offers text selection voice commands
for providers to select portions of their recorded text, such as:
"select this word"
"select this sentence"
"select this paragraph"
"select all"
To use text selection voice commands, the cursor must be placed within the text. If your cursor is in an empty paragraph, these voice commands will not be executed.
Once text is selected (via voice command), you can:
- Apply text formatting.
- Correct the text by dictating over it.
- Say add to vocabulary to manage the Vocabulary.
- Say make that an auto-text to manage auto-texts.
Select & Say Voice Commands
Select & say voice commands can be used to select recorded or typed text and correct, replace, delete or format it via voice.
These commands select the closest instance of the text to the left of the current cursor position. You can select single words, phrases, whole sentences or punctuation marks.
For example:
Say "patient is a thirty year old male with a history of hypertension"
Say "select thirty year old male"
The selected phrase is highlighted and the correction menu is displayed.

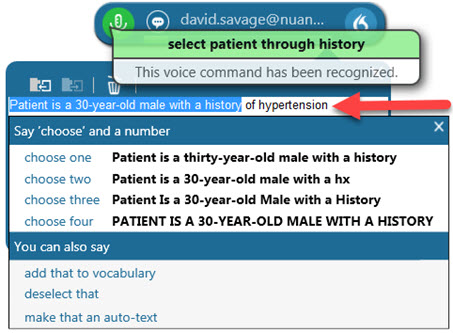
For longer text passages, use "through" to select text from the first to the last word of your required selection.
For example:
Say "patient is a thirty year old male with a history of hypertension"
Say "select patient through history"
 |
Note: The range of these commands is approximately one page up and down. |
Editing Selected Text
Once text is selected, the correction menu is displayed and you can:
- Correct
- Replace
- Delete
- Format the selected text
- Replace misrecognized text with recognition alternatives
Here are some examples:
- Say "choose" and the number of the correct recognition alternative (as displayed in the example above).
- Say the text you want or type in new text to overwrite.
- Say "add that to vocabulary" or "do not recognize that word" to manage the Vocabulary.
- Say "make that an auto-text" to manage auto-texts.
- Say "format that bold/italic/etc." to format the text.
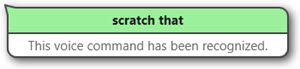
- Say "scratch that" to delete the selected text.
- Say "deselect that" to deselect the text.
To display a list of available voice commands, say "what can I say".
|
Note: The cursor automatically returns to its previous position when you correct text using the correction menu. |
Navigating Between Multiple Instances of Selected Text
Once text is selected, say "select again" or "select previous" to scroll backwards and "select next" to scroll forwards through the text to find other instances of the text. When navigating between multiple instances of the text, phonetically similar matches are also highlighted.
For example:
Say "patient has been in treatment for two years and wants to explore a different approach"
Say "select to"
The selected text:
Patient has been in treatment for 2 years and wants to explore a different approach
Say "select again"
The next selected text:
Patient has been in treatment for 2 years and wants to explore a different approach
|
Note: The commands "select again", "select previous" and "select next" are only available in correction mode (that means, when the correction menu is displayed).
The range of these commands is approximately one page up and down. |
Go Back
Say "go back" to return the cursor to its position prior to the selection command.
For example (cursor position ||):
Say "patient is a twenty year old female"
The recognized text:
"Patience is a 20-year-old female||
Say "select patience"
The selected text:
"Patience is a 20-year-old female"
Say "patient"
The replaced text:
"Patient|| is a 20-year-old female"
Say "go back"
The cursor returns to the position prior to the selection command:
"Patient is a 20-year-old female||"
|
Note: The cursor automatically returns to its previous position when you correct text using the correction menu.
The command "go back" does not work after you change the cursor position manually or type in text. |
To learn more and to keep current with any changes to this topic, review this topic within the Dragon Medical One client's Help resource.
Top
Submitting Nuance PowerMic Microphones for Replacement or Repair
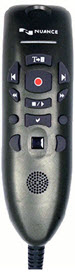 |
The Nuance PowerMic microphone is ideal for dedicated Dragon Medical dictation workstations. The PowerMic combines a robust, ergonomic USB microphone with full-function, PC-mouse capabilities to avoid constant switching from microphone to mouse to keyboard.
The latest PowerMic III supports Windows 7, Windows 8.1, Windows 10
and is compatible with USB 3.0 and USB 2.0 ports.
It is available with either a nine (9) foot or a three (3) foot cable.
Current Dragon Medical software that functions with the older PowerMic II will also fully function with the PowerMic III.
Click here to learn more. |
Troubleshooting PowerMic Microphones Before Submitting for Replacement or Repair
When a provider experiences trouble using their PowerMic microphone or is presented with a message stating that their PowerMic microphone is disconnected, the problem may not be with the microphone itself.
For Dragon Medical customers with a PowerMic that is inoperable and suspect it needs repair, please follow the steps below to assist in isolating their PowerMic as the actual source of the problem:
- In the Dragon Medical Open User window, ensure the correct Dictation Source of "PowerMic" is assigned to the user profile.
- Verify there is a PowerMic tab under the Dragon Medical client's User Options window.
- Try re-seating the PowerMic into another USB port to see if another USB port resolves the issue.
- Try using the PowerMic on another workstation to see if this is a workstation issue and not a problem with the PowerMic.
- Check that the Windows operating system recognizes the PowerMic through Windows Audio and Sound Properties.
- Temporarily disable the anti-virus application and confirm that Nuance's recommended anti-virus exclusions are present.
- Reboot the workstation.
|
Note: Otherwise, customers can submit a Case for Technical Support to further assist in troubleshooting their issue. |
Instructions on Submitting PowerMic Microphones for Replacement
If after following the above steps and isolating the problem to the PowerMic, please call Nuance Customer Account Management Center (CAMC) to submit a replacement request for this device by calling 800-833-7776 and say "Depot Repair".
PowerMic replacement is coordinated through the CAMC, available Monday through Friday, 8 am - 5 pm EST, excluding holidays.
|
Note: Defective microphones will be replaced at no charge if protected by an active maintenance contract. |
Instructions on Submitting PowerMic Microphones for Repair
If a PowerMic unit requires repair and is not protected under a maintenance contract, the PowerMic can be repaired at a flat rate charge.
For more information, please call 800-833-7776 and say "Depot Repair".
To learn more and to keep current with any changes to this topic, review this information within Article 2846.
Top
Windows 10 (1803 Update) Causes USB Microphone Failure and Audio Errors
After upgrading to Windows 10, version 1803 (Build 17134.48), some customers have reported that the PowerMic and other USB microphones are getting detected, however Dragon Medical clients do not respond when turning the microphone on resulting in audio errors.
Below is an excerpt from a Dragon Medical log file where this issue was presented:
18:15:18 S2: Info: multimedia device ID 0 name <Microphone (3- PowerMicII-NS)>
18:15:18 S2: Info: default live mic sample rate is 22050
18:15:18 S2: Info: New live source(0F462D08).DeviceName=Microphone (3- PowerMicII-NS).
18:15:23 S2: Error: Audio Open (open)(Undefined external error. (MMRESULT# 1))
18:15:23 S2: Error: Unable to turn on mic 1
In order to work around this issue, it is recommended to enable the microphone in your Privacy settings using these steps:
- Open Settings.
- Click on Privacy.
- Click on Microphone.
- Turn on the Allow apps to access your microphone toggle switch.
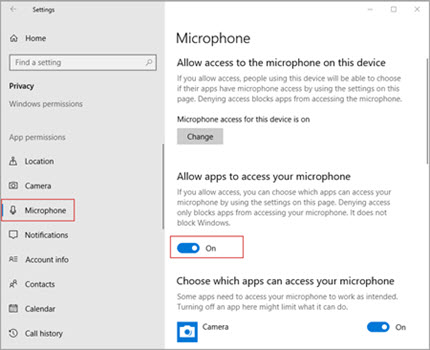
- Check the list and enable microphone access for the apps you want, if they are currently disabled. In the case where the feature isn't enable, click the Change button and turn on the toggle switch.
To learn more and to keep current with any changes to this topic, review this information within Article 6725.
|


 icon changes to
  when the speech focus is anchored to an application. When recording is on, the icon changes to
  .
You can change which application has the speech focus anchored to it at any time. Anchoring the speech focus to another application automatically releases the speech focus from the application it was previously anchored to.
.
You can change which application has the speech focus anchored to it at any time. Anchoring the speech focus to another application automatically releases the speech focus from the application it was previously anchored to.