|
This Month's eTips
Top
Dragon Medical One 5.0 Release is Here!
Nuance is pleased to announce the availability of Dragon Medical One 5.0 (as of May 30) and recommends that all clients upgrade to this release. The following new features and stability fixes are provided:
New features
- Resiliency Mode: Provides enhanced protection against service disruptions. With Resiliency Mode, users have the ability to continue using front-end speech recognition when the Microsoft Azure-based authentication database is down. For more information please view this video.
- Standby Mode / Wake-up Word: Provides hands free support for turning the microphone on and off using voice commands. Users can say "Wake Up" to turn the microphone on, and "Go to Sleep," to turn the microphone off. For more information, please view this video.
- Additional button configuration for PowerMic II, III and Philips SpeechMike: Users can now program the following four buttons on their PowerMics: Rewind, Fast Forward, Stop/Play, and Custom Left.
- Enhanced Step-by-Step options: Provides the ability to call certain voice commands as part of a Step-by-Step command. This option will enable additional automation for users who would like to build out navigational commands in their EHRs or format text as part of a Step-by-Step command.
Stability Fixes
- Resolved an issue that prevented the speech recognition profile settings from being saved properly. This manifested in the user being prompted to select the preferred microphone every time they used Dragon Medical One.
- Addressed an issue that caused Dragon Medical One to become unresponsive during dictation when deployed in a Citrix environment.
- Fixed an issue that resulted in the incorrect text insertion position when dictating into CoPathPlus.
- Remediated problems with dictating into Microsoft Word.
Dragon Medical One 5.0 can be installed via ClickOnce or the Dragon Medical One Standalone Page
Documentation
For additional information including bug fixes, minimum requirements and product life cycle, please refer to the Release Notes.
Installation and Administration Guide
To learn more and keep current with any changes to this topic, please review this information within Article 6377: Dragon Medical One - Documentation & Release Notes.
Top
Introducing Standby Mode for Dragon Medical One 5.0
Dragon Medical One 5.0 enables you to start and stop speech recognition using trigger words (instead of mouse, keyboard or microphone button).
When you work with Dragon Medical One in dictation mode the system picks up your voice and speech recognition takes place. In this mode, you can use trigger words such as microphone off to turn the microphone off or go to sleep to stop speech recognition.
When Dragon Medical One is in standby mode, your microphone is turned on, but speech recognition does not take place; the system responds only to the wake up trigger word, starting speech recognition.
 |
Note: Standby mode depends on your system configuration. For more information, contact your administrator. |
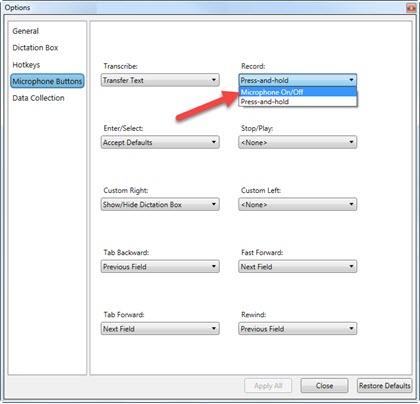
Enabling Standby Mode
To enable standby mode, do the following:
- Open Dragon Medical One.
- In the Options dialog box, open the Microphone Buttons pane.
- In the Record menu, select Microphone On/Off and click Apply All.
Working in Standby Mode
To work in standby mode, do the following:
- Click
 and start speaking; Dragon Medical One enters dictation mode. and start speaking; Dragon Medical One enters dictation mode.
- Say "go to sleep", Dragon Medical One switches to standby mode.
- Say "wake up" and start speaking; Dragon Medical One switches back to dictation mode.
|
Notes: |
- The
 icon indicates that Dragon Medical One is in standby mode and changes to icon indicates that Dragon Medical One is in standby mode and changes to when the speech focus is anchored to an application. when the speech focus is anchored to an application.
- Alternatively, say "stop listening" or "stop recording" to switch on standby mode.
- In standby mode, you can still use the mouse, keyboard or microphone button to switch on dictation mode.
- When recording is on and you do not work with Dragon Medical One for a specific period, the application will enter the standby mode (if this mode is enabled).
To learn more and to keep current with any changes to this topic, users can access the end user help resources by saying "launch help" or by clicking Help on the Dragon Medical One DragonBar menu.
Top
PowerMic III Firmware v1.43 Improves Connection Reliability, Especially in Virtual Environments
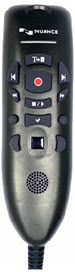 |
The Nuance PowerMic microphone is ideal for dedicated Dragon Medical dictation workstations. The PowerMic combines a robust, ergonomic USB microphone with full-function, PC-mouse capabilities to avoid constant switching from microphone to mouse to keyboard.
The latest PowerMic III supports Windows 7, Windows 8.1, Windows 10
and is compatible with USB 3.0 and USB 2.0 ports.
It is available with either a nine (9) foot or a three (3) foot cable.
Current Dragon Medical software that functions with the older PowerMic II will also fully function with the PowerMic III.
To learn more:
PowerMic webpage
PowerMic datasheet
|
PowerMic III Firmware v1.43
This latest Nuance PowerMic III firmware release, version 1.43, improves connection reliability, especially in virtual environments.
Some customers have reported problems in virtual environments with the PowerMic III staying connected reliably. The issue has presented when a Dragon Medical One user was dictating and the record light on the PowerMic III remained red. The microphone seemed to "freeze" and no error message was displayed. An earlier version of PowerMic III firmware was found and updated to the latest version 1.43, resolving this issue.
To obtain PowerMic firmware, and to learn more and keep current with any changes to this topic, please review this information within Article 3321 - Downloads and Resources - Nuance PowerMic™ Microphones.
Top
Windows 10 1803 Update Can Cause Internal Audio Errors with PowerMic/other USB Microphones
After upgrading Windows 10 to version 1803, some customers have reported that the PowerMic and other USB microphones while being detected, did not respond when turning the microphone on in Dragon Medical, resulting in audio errors.
Dragon Medical Network Edition
Below is an example error message and the results from a Dragon Medical Network Edition (DMNE) log presenting this issue:
“Audio Input device is not responding. You cannot dictate.”
S2: Error: Audio Open (open)(Undefined external error.
(MMRESULT# 1))
S2: Error: Unable to turn on mic 1
Dragon Medical One
Below is an example error message and the results from a Dragon Medical One log presenting this issue:
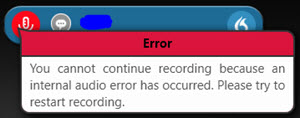
ERROR [17536]
You cannot continue recording because an internal audio error
has occurred. Please try to restart recording.
Resolution
In order to correct this issue, it's recommended to enable the microphone in your Privacy settings using these steps:
- Open Settings.
- Click on Privacy.
- Click on Microphone.
- Turn on the Allow apps to access your microphone toggle switch.
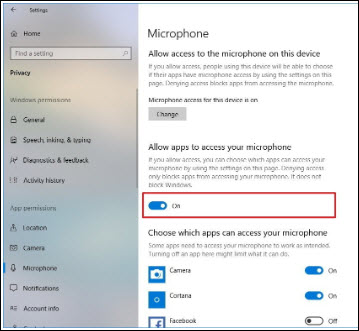
- After completing the steps, check the list and enable microphone access for the apps you want, if they are currently disabled.
In the case where this feature isn't enabled, click the Change button and turn on the toggle switch.
To learn more and to keep current with any changes to this topic, review this information within Article 6725 - Windows 10 1803 Update causes PowerMic/other USB Microphones to no longer turn-on in Dragon resulting in audio errors..
Top
Dragon Client Side Extensions Require Reinstalling Anytime Citrix Client is Upgraded, Repaired or Reinstalled
Whenever a Citrix client is upgraded, repaired or reinstalled, the Dragon client side Citrix extensions provided by Nuance (Dragon Medical One extensions or DMNE vSync) must be reinstalled. See the product-specific procedures below.
Dragon Medical One
For Dragon Medical One, the procedure to reinstall the Nuance Citrix extensions is documented below and also in the Deployment and Configuration for Citrix Environments guide provided with the most recent extension download, located here (NuanceCitrixConfig_EN.pdf).
|
IMPORTANT: If you upgrade, repair or reinstall the Citrix client, you must reinstall the Nuance Citrix Client Audio Extension. |
Re-installation
Install the Nuance Citrix Client Audio Extension on the client PC operating system (not the virtual desktop).
- Verify the Citrix Receiver, version 4.3 or higher, is already installed on the client PC. See the Requirements section (page 6) in the above NuanceCitrixConfig_EN.pdf.
- The Citrix Receiver must not be running during the installation of the Nuance Citrix Client Audio Extension.
- Log on to the client PC as an administrator.
- Open the Nuance Citrix Audio and Button Extensions from the \Client\Client Windows folder and double-click Nuance Citrix Client Audio Extension.exe.
- Follow the installation wizard.
- Make sure the device you want to use is selected as the default recording device on the client PC (Control Panel > Sound dialog box > Recording tab).
Notes:
- Microphone buttons and other controls require a separate channel. For more information, see the PowerMic control channel installation section (page 8) and Supported microphones section (page 10) in the above NuanceCitrixConfig_EN.pdf.
- The extension does not need to be installed on the server/virtual desktop; the required server binaries are already included in the application folder.
Refer to the Audio Channel Installation section (page 7) in the above NuanceCitrixConfig_EN.pdf.
Dragon Medical Network Edition (DMNE)
Dragon Medical Network Edition (DMNE) uses vSync support to provide Dragon users with Full Text Control when they work with applications published from a Citrix XenApp server.
|
IMPORTANT: If you upgrade, repair or reinstall the Citrix Receiver, the DMNE vSync components will be deleted and need to be reinstalled. |
The vSync Restoration Patch provides a quick and simple way to reinstall vSync support after updating or reinstalling Citrix Receiver. After updating or reinstalling Citrix Receiver on a workstation, run the patch on the workstation or push the patch installation to the workstation. Only use the vSync Restoration Patch to repair damaged vSync client components or to install the vSync client components for the first time.
For DMNE, the procedure to reinstall vSync is documented below and also in the DMNE 2.7 Citrix Admin Guide (page 21).
vSync Restoration Patch Pre-requisites
Ensure the following items are met before you run the vSync Restoration patch. Otherwise, the patch installation will fail and log error messages to the DgnSetup log file.
- The Dragon client must be installed on the workstation.
- Dragon must not be running on the workstation.
- A Citrix Receiver must be installed on the workstation.
- Citrix process (wfica32.exe, wfcrun32.exe, Receiver.exe, SelfServicePlugin.exe, concentr.exe) must not be running on the workstation.
You can only install the patch if the vSync components in the patch are the same version as the DMNE client installed on the workstation.
vSync Restoration Patch Installation
Perform the following steps after updating, repairing or reinstalling a Citrix Receiver on a workstation.
- Ensure above pre-requisites are met.
- On the DMNE workstation, in the \Program Files (x86)\Nuance\Nat-urallySpeaking12\Program folder, find and run the vSyncRestorer.exe file.
Alternately, you can push the patch install to the workstation.
vSync Restoration Patch Logging
When you run the vSync Restoration Patch, both success and error messages are logged to the DgnSetup log as well as the version numbers of the currently installed Citrix support components and the components in the patch. Support can access this resource if needed.
To learn more and keep current with any changes to this topic, please review this information within Article 8441 - Dragon client side extensions (including vSync) require reinstalling anytime Citrix client is upgraded, repaired or reinstalled.
|